StableDiffusionWebUI鉴权设计

StableDiffusionWebUI鉴权设计

[> [!summary]+

this article purpose is to build an authority page for stable diffusion webui using nginx & python/js. Which can publish my personal stable diffusion server. Wrote by GPT(try).

image.png

Introduction

In the digital age, the security and user-friendliness of web services are not just conveniences; they are necessities. Balancing robust security protocols with an engaging user experience is key to maintaining both the integrity and popularity of any online service. This blog post dives into the intricacies of securing web services using Nginx for authentication, coupled with designing an appealing frontend. Our journey begins with a practical scenario:

publishing a stable diffusion webUI service, accessible only to an authenticated audience.

Setting Up Nginx for Secure Authentication

Nginx excels in serving web pages and as a reverse proxy, providing enhanced security through authentication mechanisms. Let’s explore a typical Nginx configuration for secure authentication:

  • /verify_token: This block forwards authentication requests to a dedicated server. By excluding the request body and focusing on essential headers, it ensures that only valid, authenticated requests proceed.
1
2
3
4
5
6
7
8
location = /verify_token {
proxy_pass http://{your_auth_server}:2424;
proxy_pass_request_body off;
proxy_set_header Content-Length "";
proxy_set_header X-Original-URI $request_uri;
proxy_set_header X-Original-Remote-Addr $remote_addr;
proxy_set_header X-Original-Host $host;
}
  • /login: Catering to login requests, this configuration forwards the necessary details to the authentication server, preserving crucial information about the request’s origin.
1
2
3
4
5
6
7
location /login {
proxy_pass http://{your_auth_server}:2424;
proxy_set_header Host $host;
proxy_set_header X-Real-IP $remote_addr;
proxy_set_header X-Forwarded-For $proxy_add_x_forwarded_for;
proxy_set_header X-Forwarded-Proto $scheme;
}
  • Error Handling (@error401): A clever redirect mechanism that guides unauthenticated users to the login page, keeping the original URL intact.
1
2
3
location @error401 {
return 302 {your_domain}/login;
}
  • Root Location (/): The gateway to your service, which rigorously checks each request for authentication, granting access only to verified users.
1
2
3
4
5
6
7
8
9
10
location / {
auth_request /verify_token;
error_page 401 = @error401;
proxy_pass http://{your_server}:2323/;
proxy_http_version 1.1;
proxy_set_header Upgrade $http_upgrade;
proxy_set_header Connection 'upgrade';
proxy_set_header Host $host;
proxy_cache_bypass $http_upgrade;
}

This setup not only fortifies your service against unauthorized access but also maintains a seamless user experience, redirecting unauthenticated users without hassle.


AIGC05 Stable Diffusion Model Training

AIGC05 Stable Diffusion Model Training

该章节主要介绍 Stable-Diffusion 中模型的训练,考虑到硬件条件的限制,实际上这里介绍的训练,都是针对大模型的各种微调技术(Lora,Dreambooth,HyperNetwork, …),这里会以 LoRA 模型的训练为主。

参考文献:

Train LoRA

LoRA 的优势就是其模型更小,且更加模块化;也就是说其的训练成本和要求都更低,同时使用代价小,可以作为某种风格插件或者角色插件来使用。

image.png

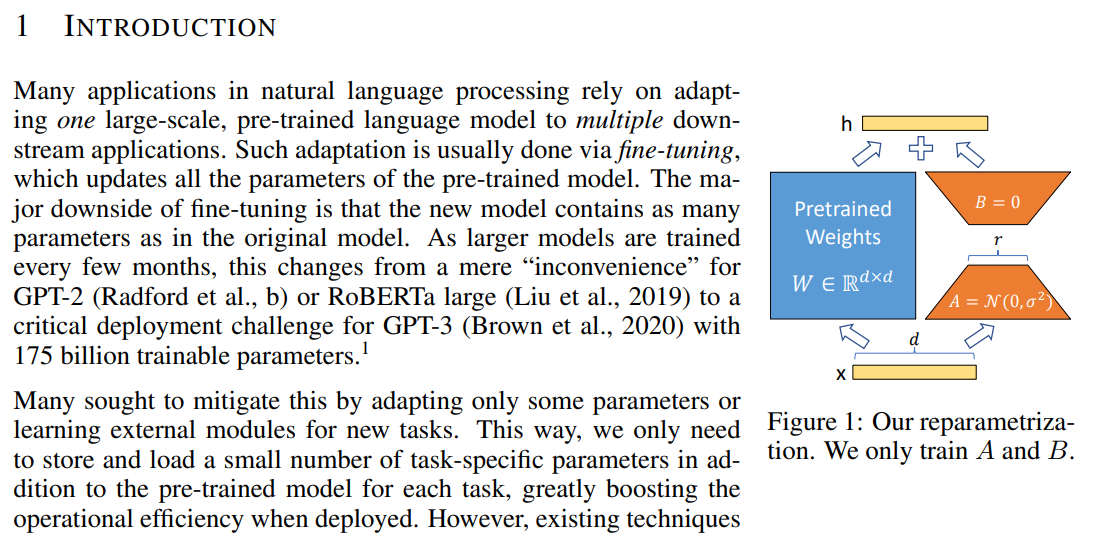
其中蓝色的是预训练好的源网络,而橙色的是新加的网络,通过控制 R 的宽度(文章主要论证了大模型的参数可能存在较低维度的秩,因此可以使用较小的 R 来对大模型的参数造成有效的影响),可以有效的减少需要训练的网络的 Size。

事前准备

这里只介绍本地训练,训练也可以在 Colab Notebook 等在线训练集群中进行,这里就不进行介绍了

  1. WebUI + 想训练的基础 SD 模型
  2. .txt 带说明的文本文件
  3. Training Repo(sd-scriptlora-script
  4. 数据集准备(准备好训练图像)

训练包准备

这里我们使用 lora-script 来进行模型训练,lora-script 实际上是 sd-script 之外在包了一层,新增了一些可视化的功能和一些其他的脚本,让 sd-script 更加易用,它调用 sd 中的脚本来实现训练,但是封装了一些注释和整理,此外还支持的 tensorboard 可视化。

sd-script 本身包含了训练 lora、dreambooth、text-embedding、UNet、Text Encoder、图像生成、模型转换等多种功能。lora-script 还是主要专注于 LoRA 训练

查看 repo 也能知道 lora-script 中包含了 sd-script,所以我们部署的时候只需

1
git clone --recurse-submodules https://github.com/Akegarasu/lora-scripts

即可将需要的库安装下来,然后安装环境和相关以来只需要执行 .\install.ps1 即可(该脚本有 cn 版本,但是可能会出现问题),其会安装 sd-scripts 和 lora-scripts 需要的库。具体的可以参考相关 repo(sd-script 详细说明,lora-script 有简化版说明)。

安装的时候可能会出现虚拟环境未激活的问题,我们可以提前在改目录执行一次 python -m venv venv 一次即可。

Finish.


AIGC04 Stable Diffusion Write Prompt Better

AIGC04 Stable Diffusion Write Prompt Better

该章节主要包括 Promot 生成和部分工作流的分析,旨在了解如何写出更好的关键词,如何生成更好的图片,当我们不知道怎么描述的时候也可以将该工作交给 ChatGPT,让其为我们攥写一般基础的提示词

Prompt 编写范式

参考资料:【Stable Diffusion】Prompt

通常编写可以遵照以下的类别进行组织,主要有 <质量控制> + <前置> + <主体> + <场景词> 几类,其中分别包括以下的几类词:

  • 质量控制:画质、镜头效果、光照效果
  • 前置词:画风、艺术家、风格
  • 主体:人物&对象、姿势、服装、道具
  • 场景:环境、背景、细节
  • Additional Network:载入额外模型

分割符号: 各个关键词之间用 , 分割,且对应的权重从前到后依次递减,因此在编写关键词的时候也要注意先后顺序。

权重加权符号:各种括号代表各种不同的加权系数,这里建议用 (prompt: weight) 统一来编写提示词的权重规则,整体可读性会更好。

这里的 weight 指的是权重变成原本的 weight 倍,就可以调整加强或减弱。

各个括号的默认系数如下: () -> 1.1 ; {} -> 1.05 ; [] -> 0.952
可以通过(())进行叠加即 1.1*1.1


AIGC03 Stable Diffusion Control Net

AIGC03 Stable Diffusion Control Net


AIGC02 Stable Diffusion 基础功能介绍

AIGC02 Stable Diffusion 基础功能介绍

本篇章介绍关于 Stable DIffusion 的一些基础概念和 WebUI 的基本功能元素,同时介绍一些启动项和模型加载的东西。

启动项设置(局域网)

最常用的启动项是 --listen,通过该启动项允许局域网内的其他设备通过 ip 和端口访问部署好的 Stable Diffusion 服务。而设置启动项的方式有以下几种:

  1. 命令行执行启动脚本的时候携带
1
2
./webui.bat --listen
# ./webui.sh --listen
  1. 修改主入口脚本中的启动选项 vim launch.py
1
2
3
# 修改下面这一行的参数, 将" "中填入需要的参数
# commandline_args = os.environ.get('COMMANDLINE_ARGS', "")
commandline_args = os.environ.get('COMMANDLINE_ARGS', "--listen")
  1. 其他的启动项介绍可以参考:2.3. 命令列引數 | Stable Diffusion WebUI使用手冊(正體中文)|Ivon的部落格 (ivonblog.com)

AIGC01 Stable Diffusion and midjourney Setup

AIGC01 Stable Diffusion and midjourney Setup

This Chapter introduce how to set up stable diffusion and mid-journey, and record some problem I meet when I deploy it.

(Deprecated) midjourney

由于 midjourney 现需要付费使用,同时没有开源,因此我们讲一笔带过该部分内容,该部分内容大多转载于 超详细!AI 绘画神器 Midjourney 基础使用手册

midjourney 的安装步骤主要分成以下的几步:

  1. 点击 Join the Beta 注册账号,注册完会跳转到;
  2. Discord 首页,亲自创建自己的服务器,仅供我和我的朋友使用;
  3. 下载客户端,在默认对话界面讯在或开始新的对话,输入 Midjourney Bot,添加到服务器
  4. 付费开启体验。

(Deprecated) DreamStudio

说是可以本地部署,但是实际体验非常不好,应该只是部署了 Webui,然后调用官方提供的免费 API;所以有时候生成不出来,但是又不报错,不知道是不是使用姿势有问题,反正很屎。

  • https://github.com/Stability-AI/StableStudio
  • 装好 npm 和 yarn
  • 参考 quick start,git clone -> (cd) yarn 安装 -> yarn dev 部署在本地端口上。
  • 官网注册账号-> 获取 API -> 填入并在最上方转到 Generate 页面即可。

Stable Diffusion 部署专题

该部分作为 Intro,仅介绍 Stable Diffusion 的安装和部署,以及一些启用参数等,具体的使用在后面的文章进行进一步的讲解。

基于官方 REPOAUTOMATIC1111/stable-diffusion-webui: Stable Diffusion web UI (github.com)

这里介绍基于 windows 的安装和 WSL2 的安装部署过程。整体的安装可能会分成以下的几个步骤进行:(推荐在安装和部署之前,参考 [[WindowsCudaCudnn]] 一文,首先配置 CUDA,也可以遇到问题再部署)

  • 基础依赖和环境安装(python、CUDA)
  • Stable DIffusion 的 UI 界面和部分插件安装
  • 模型下载和加载